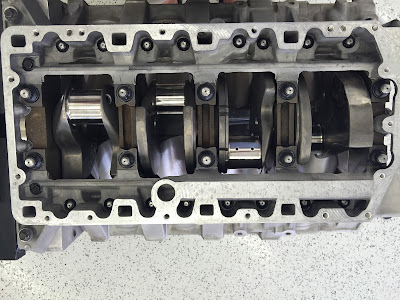
First up, I installed the main bearings. These are the OEM bearings, with a dry-film coating from the first buildup. They showed virtually no wear, so are being reused. The main bearing studs, and outer perimeter sump studs are installed into the block. The coarse threads get a light coat of 30wt oil.
The main bearings were lubed with Torco assembly lube, and the crankshaft was carefully set into the block. At this point, I also installed the front crankshaft oil seal o-ring, lightly lubed with oil. By this time, the A136 Permabond had arrived from Jerry's Gaskets, and was applied to the sump.
The main bearing studs' fine threads, as well as the washers and nut face were lubricated with ARP's Ultra Torque lube. The mains were torqued in steps--30 then 52 ft. lbs in the order specified in the service manual. Finally, the M12 studs on #1, #3, #5 bearings were torqued to 80 ft. lbs. The perimeter studs were torqued to 24 ft. lbs. The crank spins easily after all the nuts are torqued. I also checked the thrust clearance, which was within spec at .008".
Connecting rod bearings were installed in the rods, lubed with Torco. The piston rings were carefully aligned, with the gaps at least 120 degrees apart. The skirts and rings were given a light coat of oil before insertion into the bores. An ARP tapered ring compressor makes this process pretty easy. The rod caps and new Carrillo SPS multiphase rod bolts were installed, lubed with ARP Ultra Torque. The bolts were stretched to the middle of the Carrillo spec, .006", using an ARP rod bolt stretch gage. The proper stretch was achieved with 58 to 60 ft-lbs of torque.
Finally, the oil pump, crank sprocket, guides, chains and idler gear were installed. New seals on the pump, anti-seize on the crank gear, and Loctite 262 on the bolts where specified. I also took the occasion to disassemble the idler gear and apply some light assembly grease to the needle bearings. And that's as far as I am going before assembling the heads and timing the camshafts. Starting to look like an engine again....


No comments:
Post a Comment